What a difference a little Chalk Paint makes...

Sunday, February 26, 2012

I have a New Love in my life...
and it's name is Annie Sloan Chalk Paint!


My first attempt in painting with chalk paint, was for items to sell in my booth.

Let me just say,
Love it, Love it, Love it!!!

I like that it covers so well, and requires little prep on the piece being painted....stress-free painting!
The only prep I did, was to clean the pieces with a damp cloth.
And although the paint is a little pricey, it goes a VERY long way!


I created an assembly line of pieces to paint, which included the chair below...


...and the small half-round side table,
 which had already received a coat on the top when I remembered to take a picture.


I diluted the Duck Egg Blue Chalk Paint with Old White Chalk Paint to soften the finish.
 Once dry, I dry-brushed on a coat of straight Duck Egg Blue for accent.

Upholstered the seat and made a coordinating pillow in a aqua and white zebra printed fabric.


The little table was painted with straight Duck Egg Blue Chalk Paint, 
and coated with a layer of Annie Sloan Soft Wax.


Also in the assembly line to be painted, 
were two ugly old framed prints, transformed into Chalk Boards.


The large prints were painted over with black Chalkboard Paint,
 and the frames painted with the two different Chalk Paints.

{Largest - Old White
Smaller - Duck Egg}


I waited for THREE AND A HALF hours last night at an outdoor auction,
  freezing my patootie off
to bid on a few more pieces to paint,
but I got several great items!

So stay tuned, one will be fun and funky! :)

_________________________

Masterpiece Monday @ Boogieboard Cottage
Nifty Thrifty Tuesday @ Coastal Charm
Party Time @ Northern Cottage
Met Monday @ Between Naps on the Porch
Cowgirl Up @ Cedar Hill Ranch
Share Your Creations @ Kristen's Creations
Inspiration Friday @ At the Picket Fence
Potpourri Friday @ 2805

It's Official!!! ...and Dreamin' of Spring

Thursday, February 23, 2012

Took the leap,
signed the papers,
and I'm gonna do it!

April 1st, I will have a booth at the Carolina Country Peddlers Mall.

You may recall, last Fall I was seriously contemplating renting a booth, 
but decided to wait until the Spring.

 {Pictures were borrowed from their website!
In my excitement, forgot to take some of my own while visiting last week.}


My Booth will be called, "Bello Market!"


Taking advantage of our beautiful, warm "spring-like" temps to paint, paint, paint
things to sell in the booth.  
I'll share some of those projects soon!
I have about 5 going at the moment, and none are completed! ha!


In the meantime,
Just in case ya'll are
Dreamin' of Spring,
I'll leave these images, taken around my home in Spring '08.


No matter how long the winter, spring is sure to follow.  ~Proverb

_________________________________


Linking Post To:
Open House Party @ No Minimalist Here


"Starlight" Lemon Shooters

Sunday, February 19, 2012

New twist on a
hometown favorite...

"Starlight" Lemon Pie turned Shooters, that is!

Last week, for a party at my home, I converted a local Lemon Pie recipe,
 which has a wonderful key lime taste, into the Shooters pictured below.


The pie recipe was provided in a local church recipe book,
by a man who ran the restaurant at the Starlite Drive-In Theater, many years ago.
The Starlite Theater was what the movie industry referred to as,
"cow-pasture theaters", 
and was one of three built in our little town in the late 40's.
The Starlite closed in the 70's, and was the last of the three theaters to be demolished, {1987}.
I remember the structure well.

The picture is of the second Starlite, which was moved across the road from the original in '52.


Starlight Lemon Shooters

The original pie recipe calls for preparing the pie in a graham cracker crust.

To adapt the shooters recipe to the dessert glasses, I used Graham Cracker Crumbs.


A couple of teaspoons of Graham Cracker Crumbs were sprinkled in the bottom of the each glass.


Next, the filling was added.

Recipe For Filling:
1 can Eagle Brand Sweetened Condensed Milk
1/2 cup Real Lemon Juice
2 eggs yolks {whites reserved if you are using recipe for the pie}

Mix three ingredients, and pour into glasses.

{For 18 dessert glasses, I made three batches of this recipe.
The recipe makes enough filling for ONE pie.}


The original pie has a baked meringue topping.

For the Shooters, I substituted Whipped Cream for the Meringue Topping.
{Didn't know how the vintage glasses would fair in the oven, even for just a short time,
 nor did I want to find out! ha!}


For decoration and a little extra punch of lemon,
I crushed a bag of Lemonheads,
and added just a few crushed candy pieces to the tops of each shooter.


If you missed the original Party Post, and would like to see more,
click {HERE}.

I'll be posting the recipe for the Sand Tarts soon.


The Shooters were light and delicious!
But if you'd like to make the original "Starlight" Lemon Pie Recipe,
here goes...

Just a note, don't try the pie recipe on a rainy day, the meringue doesn't set well! 
~enjoy! :)


"Starlight" Lemon Pie
1 can Eagle Brand sweetened condensed milk
1/2 cup real lemon juice
2 eggs yolks, white reserved
1 graham cracker crust
1/2 tsp cream of tartar
4 T. sugar

Mix milk, lemon juice, and egg yolks, and pour into graham cracker crust.  Beat egg whites until stiff and stir in cream of tartar and sugar.  Place on top of pie and bake at 350 degrees until top is lightly brown. (10-15 minutes.)

________________________________________________

Post Linked To:
Masterpiece Monday @ Boogieboard Cottage
Nifty-Thrifty Tuesday @ Coastal Charm
Northern Cottage Party Time @ Northern Cottage
Inspiration Friday @ At the Picket Fence
Vintage Inspiration @ Common Ground

Valentines Party & A Give-away Winner

Wednesday, February 15, 2012

Don't you just love a party???

Last night I hosted a group of about 15 ladies in my home, 
for our WMU Valentines Circle Meeting.

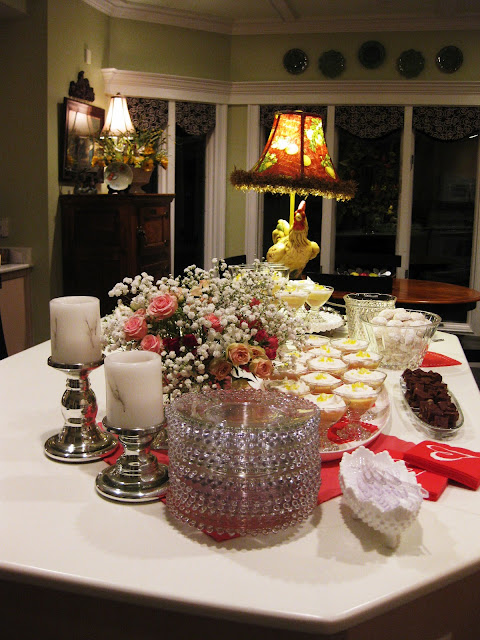
Below, are random shots of the party food ....


The "Starlight" Lemon Shooters were easy and quite tasty.
I'll share that recipe soon! 


The Sand Tarts below, have seriously jeopardized  sabotaged my fledgling diet!
But I have enjoyed them! 
They were a recipe of my Mom's, which I'll soon share, too.


The Candlewick dessert dishes were a yard sale find.
About 20 pieces, different sizes, for $7.00.
My mother-in-law had given me a set of 6, and I was uber-excited to find mates!


Cheese Station


 And a Coffee/Hot Chocolate Bar


_____________________________________________

Now...
For the Give-away Winner!!!

The Winner is a new bloggie friend and follower,

Congrats to Kim,
and THANK YOU to all who entered!  :)

______________________________________________

Linking Post To:
Wow Us Wednesdays @ Savvy Southern Style
Share Your Creations @ Kristen's Creations
Crafty, Scrappy, Happy Blog Hop Party @ Northern Cottage
Home Sweet Home @ The Charm of Home
Feathered Nest Friday @ French Country Cottage
Inspiration Friday @ At the Picket Fence
Potpourri Friday @ 2805
Open House Party @ No Minimalist Here
Table Top Tuesday @ A Stroll Thru Life

Honey Bun Cake for your Valentine Hunny

Tuesday, February 14, 2012

First up, 
Ashley made the Valentines Cake, below, for her fellow this weekend!
The inspiration came from Pinterest.

Super cute, isn't it???


And if you are looking for a simple, quick, and over-the-top delicious
dessert for your Hunny,  (or Hunnette),
try making this Honey Bun Cake.

Ingredients:
1 box yellow cake mix
1 box instant vanilla pudding
4 eggs
1/3 cups water
2/3 cup oil
(8 oz) sour cream
1/2 cup packed light brown sugar
1 tsp cinnamon (I throw in a tad more)
1 cup chopped nuts

Mix together yellow cake mix, pudding, eggs, water, oil, and sour cream; set aside.


In another bowl, mix sugar, cinnamon, and nuts. 


Use a 9 x 13 inch dish, greased and floured. Pour 1/2 of batter into pan and add 1/2 of sugar (dry) mixture.


Swirl through dough with a knife.  Add remaining batter and top with remaining sugar mixture.  Use knife to swirl topping into batter.  Bake at 325 degrees for 30-35 minutes.


It won't be the prettiest dessert you ever made, 
but I guarantee, it will be one of the best! :)


Happy Valentines Day!


 Love each other with genuine affection, and take delight in honoring each other.
Roman 12:10


______________________________________________

If you haven't entered my Give-way,
you still have time!
The winner will be drawn Wednesday at noon!

Click here to enter!

DESIGNED BY ECLAIR DESIGNS